Do you want to learn what egg candling is all about and its associated benefits? If you intend to venture into the business of hatching chicks, its important for you to read this article.
Hatching chicks is an art and proper egg candling will help you achieve high hatch rates.
What is egg candling?
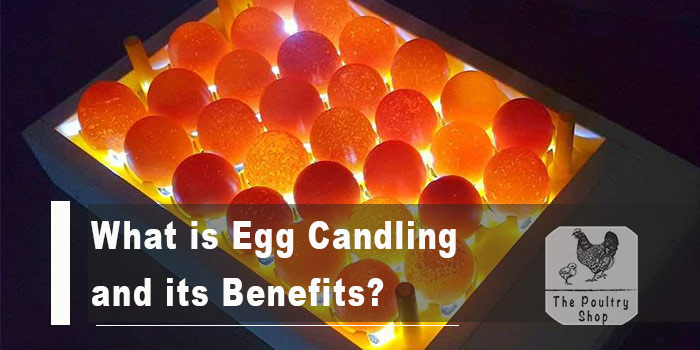
Egg candling is a simple process of shining a bright light behind an egg to check whether its fertile or not. As you may be aware, only fertilised eggs will hatch into chicks.

Back in the olden days, candles were used to provide light to see if an egg was fertile or not. This is where the term candling came from.
Due to advancements in technology, I doubt so much if people still use candles.
What are the benefits of egg candling?
- Save time and costs
Eggs that are not fertile will not hatch. Candling eggs helps to identify infertile eggs that should be removed from the incubator to avoid wasting time and costs such as electricity on eggs that will not hatch. Space created can be used to put more fresh eggs.
- Remove abnormal eggs
Some cracks on eggs can only be visible after candling. Eggs with cracks are prone to infections from bacteria and once identified, these eggs should be removed from the incubator. Eggs with double yolks should also be removed as these will not hatch.

- Calculate hatch rate properly
Hatch rate is basically a measure of your success from hatching a batch. Average hatch rate is usually 85% and your aim should be to improve to this level or even surpass this level. 100% hatch rates are also achievable.
Hatch rate is a function of fertile eggs divided by total number of chicks hatched multiplied by 100. So lets say you had 150 eggs and after candling you were left with 115 fertile eggs in the incubator. If 90 eggs hatch into chicks successfully after the 21 days, your hatch rate will be 90/115 x 100 = 78%.
How to candle eggs?
- Equipment:
Most farmers often use phone torches or specially-designed candling torches which cost roughly USD5 locally. With candling torches, you candle one egg at a time. What is important is that the source of the bright light should come through an opening smaller than the diameter of the egg you are candling. This will help illuminate the egg and make the inside contents more visible.
Candling one egg at a time may be cumbersome if you have many eggs in the incubator. This also stresses the eggs since the eggs will be out of the incubator. To remedy this, some use candling machines which can candle up to 30 eggs at once. These costs roughly USD100.

The most precise and quick way of candling is use of digital egg monitors. These small machines use infrared technology to detect and display on a screen the heart rate of the embryo. These are quite pricey though.
- Light conditions
When using candling torches or machines, this process should best be done in a dark room to ensure illumination of the light through the egg clearly shows whats inside the egg. I prefer doing this at night where I just switch off the lights in the hatchery room.
- Timing
The process of candling involves taking the eggs out of the incubator. At best, this process should be done as quickly as possible to avoid stressing the eggs. If you have many eggs to candle, its always best to take them out of the incubator in batches.
When should egg candling be done?
- Day 7
You cannot check for fertility before eggs are placed in the incubator. To be sure, only check if the eggs are fertile after 7 days in the incubator. By this time, you should expect the following:
Fertile egg – will start showing a web of blood vessels surrounding a dark spot. This shows the embryo is developing properly and you might even see it move.

Clear eggs – eggs which are clear and not showing any veins should be removed from the incubator as these are infertile. They will not hatch.
Dead embryo – a thin ring within the egg or around the short circumference shows the developing embryo died early in incubation. These eggs should be removed from the incubator.

Causes of embryo deaths during the early stages of incubation are mostly related to improper egg handling or storage, incubating dirty eggs, washing eggs and poor egg storage practices.
- Day 12
The second stage of egg candling should be done at Day 12. At this stage, the embryo (baby chick) will be much clearer and visible and even its movements can be seen through the light. Again, eggs that are clear with no signs of embryo development should be taken out of the incubator.
Conclusion
So many reasons can result to eggs failing the candling test. Some of the causes may be related to the breeder and some to poor hatching practices. I will cover these issues in a separate post to help you identify the causes of poor hatch rates and how to rectify these and increase your hatch rates to above 85% levels.
Did you find this article helpful? Leave a comment below or subscribe to my free Email Newsletter and also like The Poultry Shop Facebook page. Thanks!


Easily understood. Thanks.
Thank you so much.
Thank u so much for such useful insights I have learnt a lot
Is this among the question in by weac
2023
I enjoyed the lesson. Silas kabey from taraba state Nigeria
Informative
Thanks for the compliment Lamec!
Beneficial article. Thanks!
Your welcome!
This was a very insightful article. Thank you for sharing.
Your welcome Ivan.