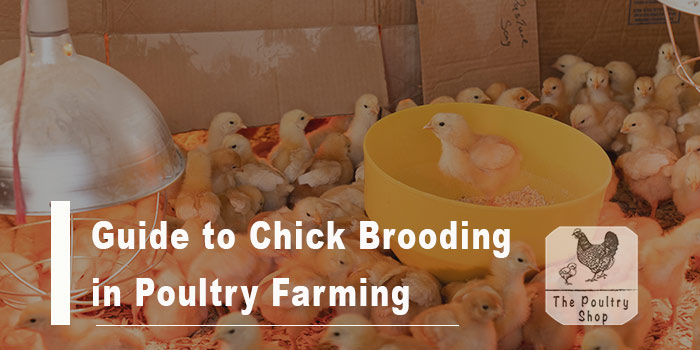
Proper chick brooding in poultry farming is essential during the first stages of a chick’s life. Brooding is the foundation for raising a healthy flock and sets your poultry farming project for success.
Surprisingly, improper brooding by poultry farmers is one of the most common causes of failure of many chicken projects.
In this guide, I will share with you basics of chick brooding that you need to follow if you need to succeed in poultry farming.
What is chick brooding?
Chick brooding refers to the process of taking care of chicks from the day the birds leave the hatchery up until they can manage to survive on their own. When chicks leave the hatchery, the birds cannot regulate their own temperature, they need assistance otherwise the birds will die.
The brooding process involves the critical management of temperature, feeding, litter, and ventilation for chicks to develop their thermo-regulatory system fully from day-old until when the birds are 2 weeks (in summer) and 3 weeks age (in winter) for broilers. For layers and roadrunners, brooding stretches from Day 1 up to 3 months.
Most farmers buy day-old chicks from local breeders whilst others hatch their own chicks. Either way, when chicks are still young, they require extra care and attention as they cannot regulate their body temperatures on their own. Brooding therefore provides the artificial conditions for the successful growth of the chicks.
What are the benefits of brooding?
During the first 14 days, a chick cannot properly control its own body temperature hence it is essential to manage this for them. With good brooding you will accelerate the rate of growth of the chicks and improve the following:
- development of skeletal structure
- growth of the cardiovascular system
- appetite and water consumption
- development of the health and immune system
- minimize stress
Poor brooding management causes a lot of damage that will manifest in older birds or later in the flock resulting in high mortalities and losses. Therefore, you need to pay attention to the following brooding basics.
Basics of Chick Brooding
The key to successful poultry farming starts with having a systematic and efficient management program in place. This program must start well before chicks arrive. Pre-placement house preparation as part of a management program provides a basis for an efficient and profitable flock.
Observe the following chick brooding basics:
1. Proper chick selection
Always buy chicks from professional, reliable, and reputable suppliers who vaccinate chicks at the hatchery against Infectious Bronchitis and Newcastle. As birds grow, you will need to follow the relevant vaccination schedules against common poultry diseases. Vaccination schedules differ for broilers, layers, and roadrunners. Alternatively, herbs work as natural vaccines against most common poultry diseases.
When you receive chicks, you need to inspect and only select for placement in the brooder chicks that are visibly looking strong, alert, active, and without deformities. Either quarantine or destroy completely chicks that sickly or have deformities as these can infect the whole flock and result in huge losses.
Collect chicks early in the morning or late afternoon when the weather is not too hot. Chicks should be placed in the brooder as soon as possible.
Avoid moving around with chicks in the car stressing and depriving the birds of water. During transportation, ensure good ventilation and avoid bumpy rides as birds are still weak.
2. Adequate brooding space
Clean brooder house thoroughly and disinfected 10 days before chicks arrive. The brooding area should have enough space to accommodate the chicks comfortably.
For small quantities, brooder rings made of cardboard are more common and recommended as the round shape provides no corners for chicks to huddle when they are cold. Chicks often die in large numbers from suffocation when they huddle in corners trying to warm each other. If you have square boxes, put some materials such as cloth or newspapers to close out the corners.
Cover the top of the brooder ring with a blanket to increase warmth especially when its cold. Always ensure you leave space to allow fresh air into the box to avoid suffocating the chicks.
For large quantities, partition the poultry house with double curtains that can trap heat to ensure the chicks stay warm. Curtains should open from top to bottom to avoid introducing darfts or cold air from the bottom when entering the brooding area.
As chicks grow, adjust the brooding area by moving the curtains to ensure spacing remains comfortable for the chicks.
Spacing (30-35 chicks per sqm) is very important to avoid overcrowding which can result in suffocation and lack of enough room to access feed and water.
3. Adequate brooding temperatures
Poor heat management is a recipe for disaster. Chicks require adequate warmth. Pre-heating of the brooding area should be done 24hours before chicks arrive to give adequate time for the brooding house to warm up to the recommended temperature of between 30-35 degrees celsius.
If the brooding area is too cold, chicks will huddle together as they try to warm each other. The birds will not eat properly negatively affecting growth. Due to cold temperatures, chicks can suffer from flu-like symptoms and pneumonia which can result to high mortalities.
If brooding temperatures are too high, chicks may suffer from heat stress and dehydration. A chick’s body is 70% water. If temperatures are too high, water will be lost quickly resulting to dehydration and ultimately death. High temperatures cause vent pasting and you may notice chick’s poo sticking around the vent leading to blockage and death of chicks.
You need to maintain ideal temperatures comfortable for the chicks and always check the comfort of chicks several times each day, especially in the evening and early mornings (between 1 am and 3 am).
For heating, most small scale poultry farmers use gas brooders, infrared bulbs, charcoal burners (mbaura), hot water bottles, or charcoal in clay pots. Infrared bulbs are more convenient and each bulb can cover 250 chicks. One disadvantage of infrared bulbs is that they use too much electricity.
It’s always best practice to keep a thermometer in the brooder house to ensure you can monitor closely and accurately temperature at chick level and floor level to check litter or bedding temperature.
However, the best indicator of the correct temperature is chick behavior. You should always monitor chick behavior to check if the brooding area is too hot or too cold. If the temperature is just right, the chicks will be evenly spread. Too draughty, chicks will be too noisy and huddled together away from the draught source. If too cold, chicks will be noisy and huddled under the heat source. If too hot, chicks will be drowsy, panting, and spread around the brooder edges away from the heat source.

Monitoring chicks time and again helps to quickly identify and make adjustments to maintain chick comfort and avert any mortalities.
4. Adequate ventilation in the brooder
Ventilation is the free movement of fresh air continuously through the poultry house or brooder area. Chicks always require good air quality for optimal performance.
Good ventilation helps to provide chicks with oxygen, keep litter dry, maintain optimum relative humidity and continuous removal of excess heat, dust, carbon dioxide, and foul gases like carbon monoxide and ammonia.
During cold winters, farmers tend to deprive chicks of fresh air as they try to increase warmth. This should be avoided at all costs as chicks may suffocate and die. Breathing humid and unclean air full of toxic gases like carbon monoxide results in respiratory infections or diseases such as Ascites which may affect the birds around 4-5 weeks later resulting in high mortalities and losses.
5. Access to clean drinking water
Access to clean water mixed with stress pack is the first thing chicks should get as soon as they arrive in the brooder. Hold every chick and dip its beak in water to ensure it takes a gulp. Water helps to rejuvenate the chicks after the stress from the hatchery, handling, and transportation.
Chicks should have access to drinking water mixed with stress pack for the first 3-5days to boost appetite and immune system. In hot summer months, water should always be cool and during cold winters, ensure the water is a bit warm.
Chick fonts should be placed in the brooder at strategic places where chicks can easily access the water. One 4L chick font can serve 50 chicks and one 16L chick font can cover 100 chicks. Increase fonts where necessary as chicks should not walk 2 meters to find water.
Chicks fonts can be replaced with 16L fonts from around Day 10 so that by Day14 all small fonts have been replaced by bigger fonts. Adjust the height of the equipment to the bird’s back level by using strings or placing fonts on bricks.
Take care not to place water sources directly under the heat source such as infra red or charcoal burner.
Clean the drinkers under running water and drinking water should be changed a minimum of 4 times a day or as many times as is necessary. If water is not fit for human consumption, do not serve the birds either.
Use plastics drinkers as they are easy to clean and do not get rusty over time. Rust in drinking water can cause infections and deaths.
6. Access to clean feed
During brooding, chicks need access to feed all the time (ad-lib). Starter feed helps in the growth of vital organs and the chick’s immune system. Failure to access enough feed results in poor growth and immunity against diseases.
Feed trays should be filled with fresh and clean feed at all times. Chicks will not eat if the feed looks stale or dirty. Practice proper hygiene by removing any chick droppings that might be in the feed trays.
For the first few days, spread khaki papers or newspapers on top of bedding to avoid chicks eating litter. Sprinkle some feed on top of the newspapers to help chicks get supplementary feed.
Do not place chick trays directly under heat sources.
Chick trays should be accessible and enough to cater for all chicks. Rule of thumb: 1 chick tray per 50 chicks.
Feeding ratios differ from supplier to supplier depending on feed type. Its always best to consult with feed suppliers on the feed program that offers the best growth for your birds at a reasonable cost to your business. Take note that feed accounts for almost 70% of total production costs hence you need the most viable feeding program.
Clean feeders under running water to remove soapy substances. Store feed in a cool dry area that is free from rodents or wild birds.
7. Proper litter management
Bedding provides many benefits: insulates the birds from cold floor temperatures, absorbs moisture, reduces foot pad dermatitis, helps dilute droppings thus minimizing chick to manure contact and helps reduce breast bruises.
Spread litter to a depth of 5 to 10cm.
Wood shavings serve as the best when it comes to bedding due to its high absorptive qualities. Chopped grass and cottonseed hulls also work well as litter although the absorptive qualities are not as good as wood shavings.
Treat litter with formaldehyde pills before placement to reduce cases of fungal (Aspergillosis) or bacterial infections.
Avoid green grass and sawdust as chicks often mistaken sawdust for feed.
Break up any litter crumbs using a garden fork and turn litter once per day to keep it dry and avoid build-up bacteria and ammonia gases. There should be no damp parts around the drinkers. Remove wet litter or molds around the drinkers and replace them with dry bedding. Discard the wet litter or crumbs far away from the brooder and not within the poultry farm or yard.
Remember that poor litter management causes poor feed intake, poor growth rate, poor uniformity, cold feet, huddling of birds with reduced activity.
8. Proper lighting program
High light intensity and uniform distribution throughout the brooding area helps stimulates chick activity. Light should always be available and of high intensity to allow birds to access feed and water at all times during the brooding stage.
You will realize that as long as chicks can see feed or water, they will always eat. So always keep the switches on. If you can read a newspaper in the brooding area then the light is clear enough.For lighting, one 18watt energy saver light is sufficient to cover 200 birds.
Reduced light hours program can be implemented after the brooding stage for better feed conversion, cut on feed costs and electricity, and to give birds time to rest and avoid panic-related deaths when power cuts occur.
9. Proper biosecurity
Biosecurity is a set of preventative measures designed to minimize the risk of introducing diseases into the poultry house or brooder. It is the cheapest and most effective means of disease control available.
Take note of the following biosecurity essentials:
- Chicks require special care and hygiene. Dirty environments breed diseases and heavy losses.
- Minimize non-essential visitors to the poultry house and limit animals into the brooding area as this exposes chicks to diseases.
- Have a foot bath with a disinfectant at the entrance door.
- Always wash hands and sanitize before touching chicks.
- Have a robust control program for rodents, snakes, and mosquitos.
- Keep the area around the poultry house clear from bushes and grass.
- Avoid mixing chicks from different suppliers.
- Dispose of manure far away from the brooding areas (>2km away). Do not place manure in the garden to avoid transferring diseases back into the poultry house from the garden.
- Throw away dead birds either by burning or burying in deep pits far away from the brooder.
Conclusion
Following these chick brooding basics will save you from a lot of disappointment later in your poultry farming project. If you treat your chicks well from the onset, the birds will pay you well later. All the best!
Did you find this article helpful? Leave a comment below or subscribe to my free Email Newsletter and also like The Poultry Shop Facebook page. Thanks!

Thanks for the information and appreciated indeed
Thank you
Thank you so much I really appreciate because is helpful to me because am a beginner at this business
Thank u!
Your welcome Taurai.